

Few weeks ago,I was asked by a friend of mine if I could help him build a product counter that will count finished products after a worker has processed them.The current situation was that a worker manning a processing station had to take each product and process it, then count them and sort them into batches.And eventually he also places them in a shipping box/crate where they would be sent off to another factory.All this was done by manually noting down the amount of processed products after each process and then note down the amount of finished batches using only pen and paper.
金宝搏188beat网登录appConsidering that each day several thousands of these products need to be processed by a single worker ,a product counter will save a lot of time and eliminate any counting mistakes that will require a recount of an entire batch.We are dealing with irregular sized products which come in different sizes (but all circular) and travel on different sized guide rails.So he asked if I can produce a simple counter that can be configured on site according to the size of the products and also that it can be easily moved from one station to the other without too much hassle.
PARTS REQUIRED:
- 1x Arduino Uno board
- 1x Olimex LCD + 4 buttons shield
- 1x Sharp 4-30 cm IR sensor
- 1x 3 wire cable with JST connector
WORKING OF PRODUCT COUNTER:
The code was written so that it will continuously monitor the analog input signal coming from the sensor.Once the signal value has reached a certain threshold it will trigger a count and then wait for the signal to drop a certain amount below the threshold for the count function to reset and prepare for the next count.
This allows the product counter to be used on various sized objects (assuming that they are all round and they all travel in line one after another).Since the accuracy of the counter greatly depends on the way that the sensor is mounted and positioned it is important to remember that the smaller the counted products are the more precision, calibration and testing that needs to be applied before using this counter in a production environment.
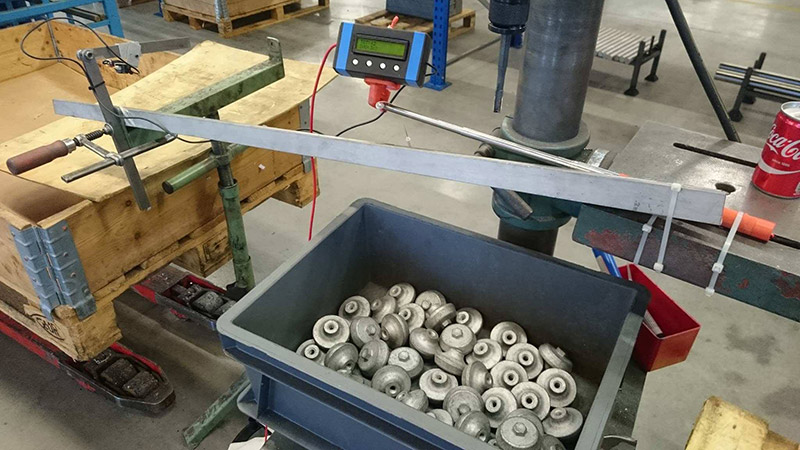
金宝搏188beat网登录appNote that I chose to setup the sensor above the products and facing down towards the guide rail.You can position the sensor in any other way only take into consideration interference from the work environment that might trigger false counts such as people walking close by or other objects.If you choose to position the sensor on the side or the bottom you should consider adding some sort of enclosed housing or a back plate that will provide a constant distance value for when there are no products passing the sensor.If you are dealing with smaller sized products than the ones demonstrated in the video you might also need to consider adding housing to the IR LED on the sensor which will direct the light beam onto a defined area instead of just allowing it to spread in the default manner that the sensor was designed for.

Below you will find a diagram explaining about the calibration and the minimum and maximum values used in the source code!also you will find the source code itself which mainly focuses on making the device more user-friendly and can be customized on site alongside with some photos from the testing phase.

HOW TO SET UP PRODUCT COUNTER USING ARDUINO – VIDEO:
You can find better explanation for this product counter in the below video.
CODE:
#include
// OLIMEX LIBRARY #include
// OLIMEX LIBRARY LCD16x2 lcd!// LCD OBJECT int buttons!// HOLDS THE 4 BUTTONS VALUE FROM THE OLIMEX LCD SHIELD int iCounter=0!// holds the number of products counted int iSenseMin=420!// sensor minimum value for count function reset (calibrate in a testing enviroment then set as default values) int iSenseMax=450!// sensor maximum value to indicate a valid count (calibrate in a testing enviroment then set as default values) bool bCountFlag=0!// a flag indicating the specific count current state bool bActiveFlag=0!// a flag indicating if the device is in counting mode or menu mode bool bMenuFlag=0!// a flag indicating if the menu is active void setup(){ //Serial.begin(9600)!// serial for debugging Wire.begin()!// communication with the 4 built in buttons on the shield lcd.lcdClear()!// clears the lcd BootDelay()!// an initial delay for settling and logo } void loop() { ButtonRead()!// reads the state of the buttons (button 1 specifically to break the counting function) if(bActiveFlag) // active counter function loop { if (SensorRead()>iSenseMax) { if(!bCountFlag) // if the count state flag is not set a new count will be carried out { iCounter++!// add count Counting()!// display new count value //Serial.println(iCounter)!// debugging bCountFlag=1!// sets the count flag to true indicating that no further counts can be made until flag is set to false while(bCountFlag) // a hold to wait for the sensor to go below the minimum value { if(SensorRead()
Related Posts:
-

Visitor counter project using Arduino
-
Buy parts with LCSC
-
LoRa-E5 - IOT development module
-
Don't worry about the end
-
How to Order your parts from LCSC
-
Prototype your PCB boards with PCBgogo
-
Two Digit Counter Circuit using 7 Segment and IC 4026
-
7 Segment Counter display Circuit using IC 555 and CD4033


